Crafty mammas, here are some fun projects you can do with duct tape.
A gal named Fabian Morgan is the author of the Duct Tape Series Books: Tape It & Make It, Tape It & Make More, Tape It & Wear It and her newly released book, Duct Tape Bags. Fabian Morgan has provided complete instructions for each project below, including suggested materials and tools.
#1 SPIDER WEB DOOR SIGN
Materials: black, orange, and gold duct tape, oversized sheet of paper (ideally 18″ x 24″), parchment paper.
Tools: pencil, ruler, scissors, white grease pencil
Instructions
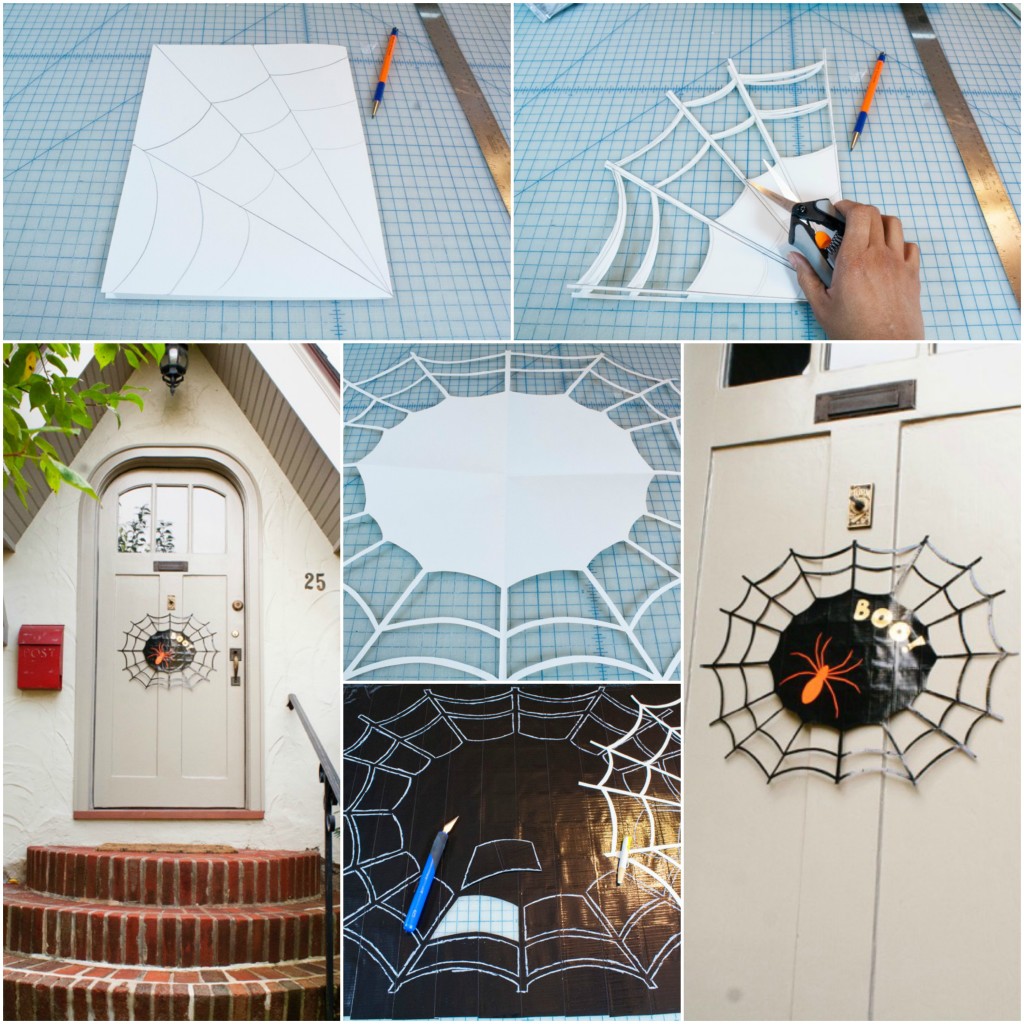
1. Fold the oversized sheet of paper in half lengthwise, then fold in half crosswise. From the folded corner, draw a diagonal line to the opposite corner. You should now have two triangles. From the same corner, draw two more diagonal lines, dividing each triangle in half.
2. Starting at the bottom left corner, draw slightly U shaped line upward, connecting to the left end of the diagonal line above it. From this point, draw another U shaped line to the next diagonal line, and repeat until you reach the top right corner of the folded paper.
3. Starting approximately 2″ inward from the bottom left corner, repeat step #2.
4. Starting approximately 4″ inward from the bottom left corner, repeat step #2. You should now have 1/4 of a spider web pattern.
5. Carefully cut out the top two lines of the web pattern, cutting each drawn line approximately 1/4″ thick. Leave the middle part intact. Unfold the paper. This is the web template. Set aside.
6. Using black duct tape for the front side and gold duct tape for the back side, make a double-sided duct tape fabric measuring 18″ high and 24″ wide. (See instructional video: https://youtu.be/6YZSNYyy57w )
7. Take the web template and place it on top of the fabric. Trace the template onto the fabric. Remove the template and cut the web pattern out of the fabric.
8. On the parchment paper, draw a spider. (You can also do a Google search for “spider drawing” and trace any free illustrations.) Cover the drawing with orange duct tape. Flip over the parchment paper and you can still see the drawing. Cut out the drawing. Remove the parchment paper from the back of the spider and place it on the web.
9. On the parchment paper, draw “Boo!” in large bubble letters. Cover the drawing with gold duct tape. Flip over the parchment paper and you can still see the letters. Cut out the letters. Remove the parchment paper from the back of the letters and place it on the web.
#2: PUMPKIN STICKERS (FAUX JACK O’LANTERN)
Materials: black duct tape, parchment paper, pumpkins
Tools: pencil, scissors
Instructions
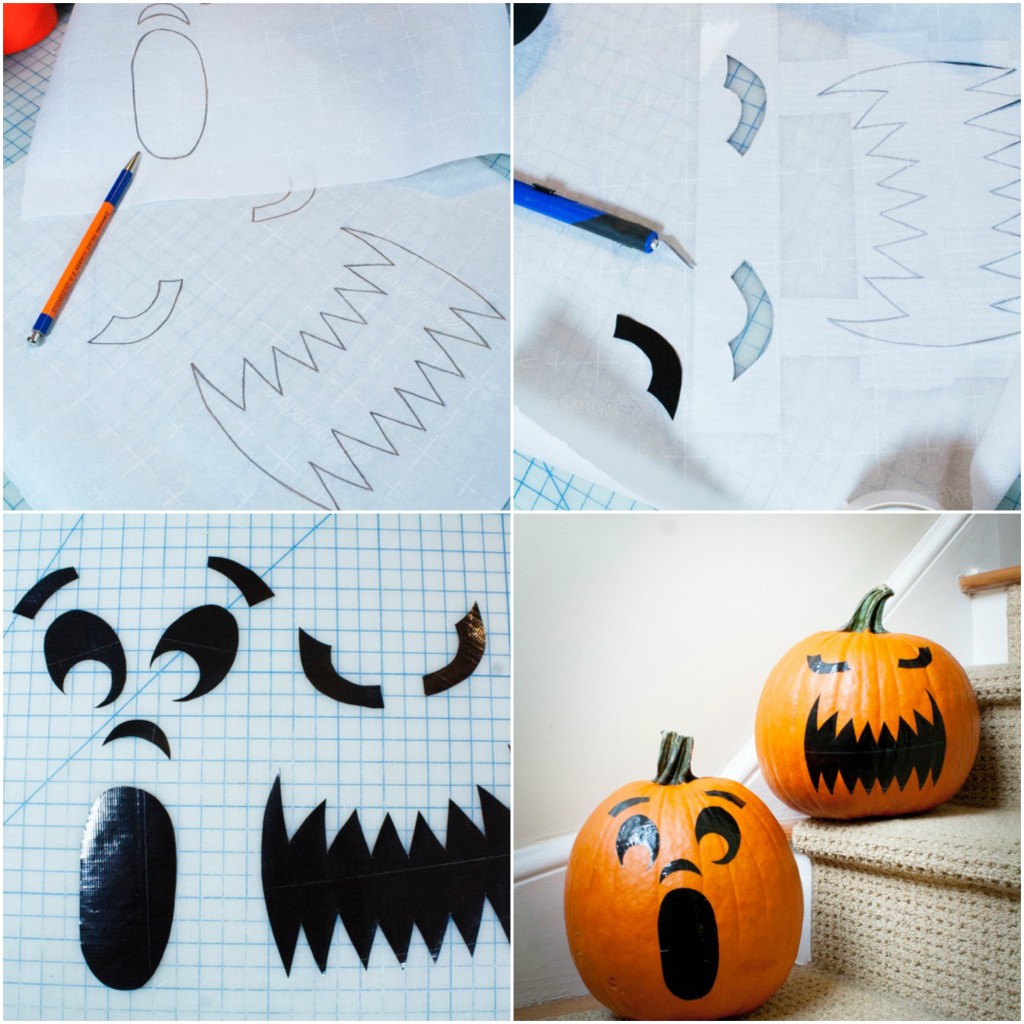
1. Draw Jack O’Lantern faces on the parchment paper.
2. Cover the drawing with black duct tape.
3. Flip over parchment paper. You can see the drawing through the parchment paper. Cut out the Jack O’Lantern face pieces using scissors.
4. Remove the parchment paper from the back of the face pieces and place on the pumpkins.
#3: Three Masks:
1. PLAIN MASK
Materials: black duct tape, parchment paper, gauge wire
Tools: mask template, grease pencil, scissors
Instructions
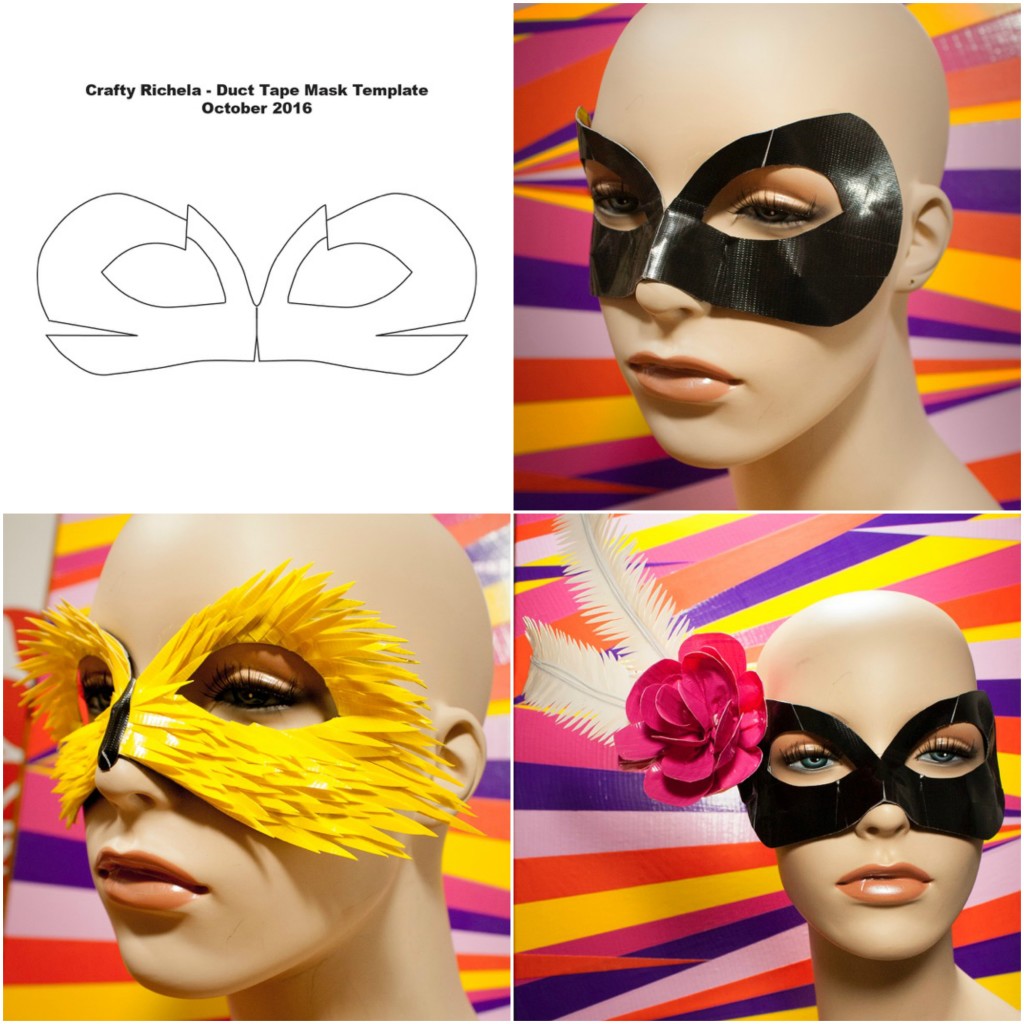
1. Print and cut out mask template.
2. Make a double-sided duct tape fabric measuring 6″ high and 8″ wide. (See instructional video: https://youtu.be/6YZSNYyy57w )
3. Trace the mask template onto the fabric using the grease pencil. Cut out the mask.
4. Align the top slits so the eye holes of the mask are almond-shaped. The top of the mask should become rounded and contoured. Close the slits with small pieces of duct tape.
5. Pull the side slits of the mask towards each other, which closes up the V space. Hold it in place with small pieces of tape. This should further round and contour the mask.
6. On the inside of the mask, tape a 1″ piece of wire across the nose. Then bend the mask in half vertically.
2. BIRD MASK
Materials: yellow and black duct tape
Tools: scissors
Instructions
1. Make a plain mask.
2. Cut 10″ strips of yellow duct tape. Place them on the worktable lengthwise with the sticky side facing up. Fold in half lengthwise by pulling up the bottom edge toward the top, but not all the way up. Leave approximately 1/4″ strip of the sticky side exposed at the top.
3. Starting at the bottom edge, cut out long triangles from the folded strips that measure approximately 1/4″ wide. Be sure the wide base of each triangle is at the top sticky edge.
4. Add the feathers to the mask. Work one side at a time, either the left or the right. Start the nose and work your way around the outer edges of the mask. Be sure the point of each feather faces out. As you add the feathers, try to space them evenly.
5. Add a small black strip of duct tape vertically over the nose.
3. FEATHER MASQUERADE STYLE MASK
Materials: white, fuchsia, and black duct tape
Tools: gauge wire, scissors
1. Make a plain mask.
2. Using the fuchsia duct tape, make a flower. (See instructional video: https://youtu.be/cYDMUg0pJIo ) Cut out petals.
3. Attach the fuchsia flower to the right side of the mask using small pieces of black duct tape.
4. Cut a 10″ strip of white duct tape. Place them on the worktable lengthwise with the sticky side facing up. Place a 10″ piece of wire lengthwise in the vertical center of the tape strip. Cut a second 10″ strip of white duct tape and place it lengthwise over the first strip, sticky side facing down. At one end, cut an upside down V shape. Starting at the pointed end, cut narrow V slits along the sides toward the middle of the strip, almost touching the wire in the center. This is a feather.
5. Repeat step 4 for a second feather.
6. Attach the two feathers to the right side of the mask, behind the fuchsia flower.


